Billing & Credits
Virtual Staging ART uses a credit-based system with two credit types: photo credits and upload credits. You can get either type through subscriptions or one-time purchases.
Credit Types
Photo Credits
Photo credits are used per generated output. 1 photo credit = 1 photo render. This is the default credit type for new plans and purchases.
Upload Credits
Upload credits are used per uploaded source photo. 1 upload credit = 1 uploaded photo, with included re-renders depending on the model type.
| Flow | Included renders per upload credit |
|---|---|
| Staging / decluttering classic models | Up to 20 |
| Staging / decluttering premium models | Up to 8 |
| House rendering | Up to 8 |
| Photo editing | Up to 8 |
Upload credits remain available for accounts that prefer the legacy upload-based workflow.
Credit Sources
Subscription Credits
Included with your monthly plan. These credits refresh each billing cycle - unused subscription credits do not roll over.
Purchased Credits
Bought separately via the Buy Credits page. These credits never expire and carry over month to month.
Usage-Based Credits
Available for enterprise accounts. You're charged per credit used at the end of each billing period.
Credit Costs
For photo credits, each generated render uses 1 photo credit.
For upload credits, each uploaded source photo uses upload credits and includes the re-render allowance shown above. If a workflow requires more than one upload credit, the app shows that before you start the generation.
The app always shows the credit type and expected charge before you purchase credits, subscribe, or start a generation.
Checking Your Balance
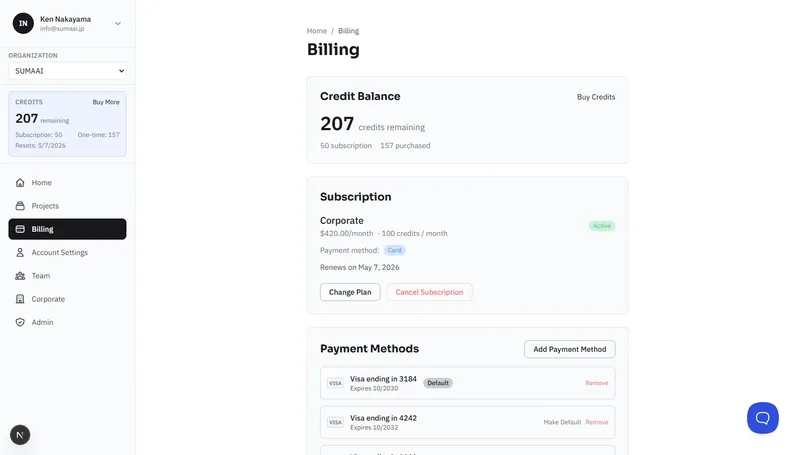
Navigate to Billing in the sidebar. You'll see:
- Photo credits and upload credits, when your account has both
- Your default credit type for future generations
- Monthly vs. purchased credit breakdown when both sources are available
Subscription Plans
Virtual Staging ART offers several plan tiers:
- Free Trial - 10 free photo credits when you sign up (available in supported countries)
- Monthly subscriptions - Starter, Professional, Agency, and Corporate tiers with included monthly credits
- Pay As You Go - no subscription; buy credits individually. Photo credits are $1 / credit (USD) or ¥150 / credit (JPY), and subscription plans start from 50c / photo (USD) or ¥75 / photo (JPY).
All plans include unlimited projects. Credits refresh monthly on subscription plans.
Plan Features by Tier
| Feature | Starter | Professional | Agency | Corporate |
|---|---|---|---|---|
| All AI providers | Yes | Yes | Yes | Yes |
| HD export | Yes | Yes | Yes | Yes |
| Email support | Yes | Yes | Yes | Yes |
| Priority support | Yes | Yes | Yes | |
| Bulk download | Yes | Yes | Yes | |
| Team members | Yes | Yes | ||
| API access | Yes | Yes | ||
| Dedicated support | Yes | |||
| Custom integration | Yes | |||
| Sub-account management | Yes |
Subscribing
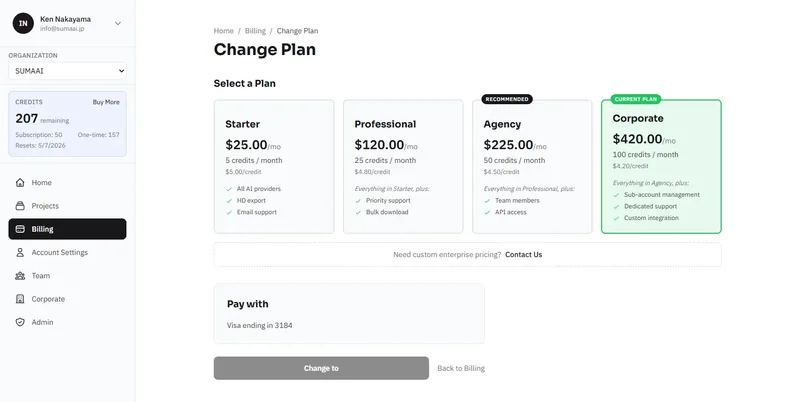
- Go to Billing > Subscribe (or View Pricing).
- Choose a plan.
- Select a payment method (add one if you haven't already).
- Confirm the subscription.
- You're charged immediately, then monthly on the renewal date.
Changing Plans
- Go to Billing > Change Plan.
- Select a new tier.
- Prorated charges are applied automatically.
Canceling
- Go to Billing > Cancel Subscription.
- Confirm the cancellation.
- You keep access until the end of your current billing period.
- You can Resume the subscription at any time before it expires.
Buying Credits
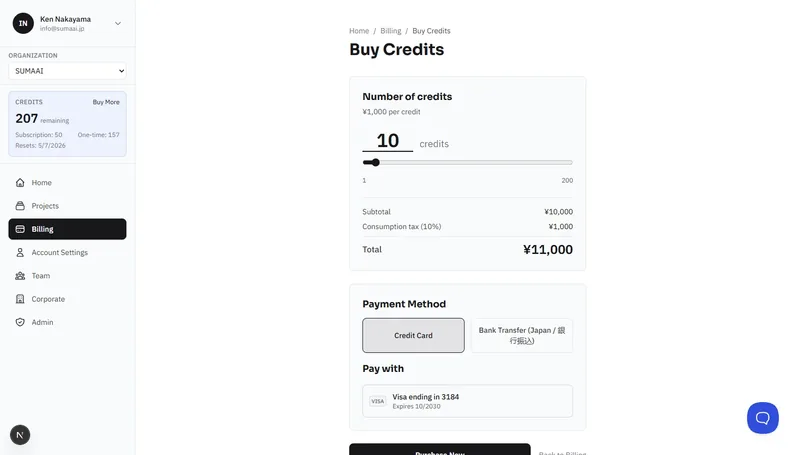
- Go to Billing > Buy Credits.
- Choose Photo credits or Upload credits.
- Use the slider to select how many credits you want.
- The page shows the per-credit rate and total price.
- Choose a payment method.
- Set or confirm your billing address (required for tax calculation).
- Review the total including any applicable tax.
- Click Purchase Now.
Tax
Consumption tax is calculated based on your billing address. For accounts based in Japan, the applicable consumption tax rate is shown on the purchase summary.
Payment Methods
Credit / Debit Card
- Go to Billing > Payment Methods.
- Click Add Payment Method.
- Enter your card details via the secure Stripe form.
- The card is saved for future purchases and subscription renewals.
You can:
- Set a default card for automatic payments.
- Remove a card you no longer use.
Bank Transfer (Japan)
Bank transfer payment is available for accounts with a Japanese billing address. When you set your billing address to Japan, a Bank Transfer option appears alongside the credit card option on both the Buy Credits and Subscribe pages.
Buying Credits with Bank Transfer
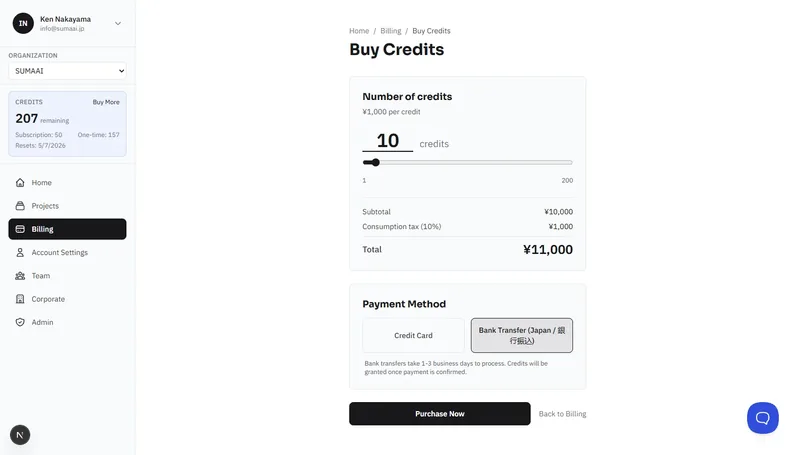
- Go to Billing > Buy Credits.
- Choose Photo credits or Upload credits.
- Select the number of credits you want.
- In the payment method section, select Bank Transfer (Japan / 銀行振込).
- Review the total (including consumption tax) and click Purchase Now.
- Confirm the purchase in the dialog that appears.
- You'll be redirected to an invoice page showing the bank transfer details.
Subscribing with Bank Transfer
- Go to Billing > Subscribe (or View Pricing).
- Choose a plan.
- In the payment method section, select Bank Transfer (Japan / 銀行振込).
- Click Subscribe Now and confirm.
- You'll be redirected to an invoice page showing the bank transfer details.
- Your subscription activates once the transfer is confirmed.
- Future subscription payments are invoiced 7 days before the due date.
Bank Transfer Details
After confirming a bank transfer payment, you'll see an invoice page with these details:
- Bank name and bank code
- Branch name and branch code
- Account number
- Account holder name
- Account type (普通 / 当座)
- Transfer reference - highlighted in red. You must include this reference in your transfer so the payment can be matched to your account.
- Amount to pay - the exact amount to transfer
Click Copy Bank Details to copy all the information to your clipboard for easy pasting into your bank's transfer form.
Completing the Transfer
- Log in to your bank (online banking or at a branch) and initiate a transfer to the account shown.
- Enter the exact amount displayed on the invoice.
- Include the transfer reference in the transfer remarks/memo field.
- After making the transfer, click I've Made the Transfer to return to the billing page.
- Your payment will be confirmed within 1–3 business days. Credits or subscription activation will be applied once confirmed.
Viewing Pending Payments
Bank transfer payments awaiting confirmation appear in the Pending Payments section on the Billing page. Click View Payment Instructions to see the bank details again if you need to reference them.
Switching Payment Methods
If you're on a subscription, you can switch between card and bank transfer:
- Go to Billing.
- Click Switch to Card or Switch to Bank Transfer.
- Confirm - the change applies to the next billing cycle.
Invoices
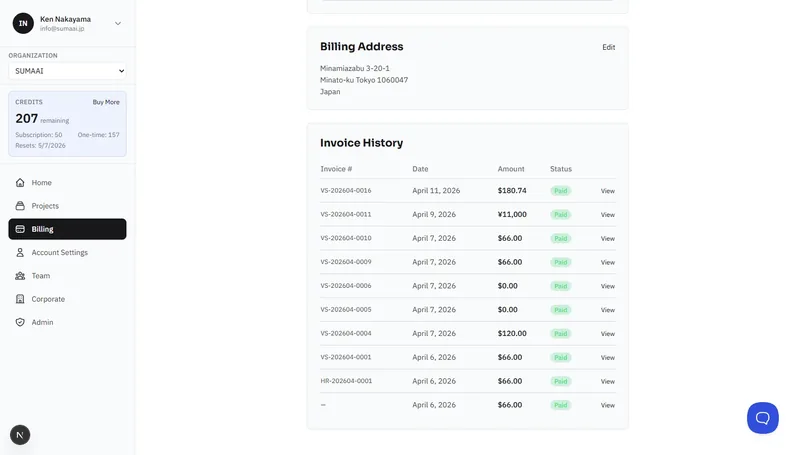
View your complete invoice history under Billing > Invoice History:
- Invoice number, date, amount, and status
- Status: Paid, Open, Draft, or Void
- Click View to see the full invoice details
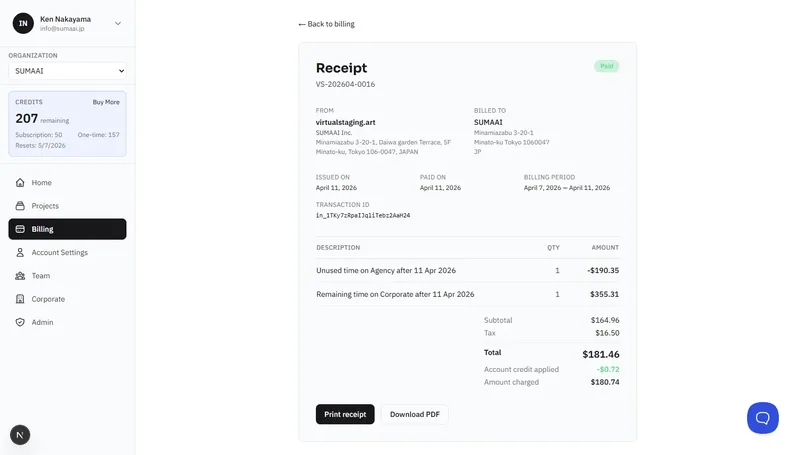
From the invoice detail page you can:
- Print the invoice/receipt
- Download PDF - saves a PDF copy of the invoice or receipt
- View bank transfer instructions (for unpaid bank transfer invoices)
Account Notices
- Chargeback Dispute - if a payment is disputed, credit usage is suspended until the dispute is resolved. Contact support for help.
- Past Due - if a payment fails, update your payment method to avoid service interruption.
- Credits Paused - in rare cases, credits may be paused. Contact support for assistance.